Hibernate Tutorial

This hibernate tutorial provides in-depth concepts of Hibernate Framework with simplified examples. It was started in 2001 by Gavin King as an alternative to EJB2 style entity bean.
Hibernate Framework
Hibernate is a Java framework that simplifies the development of Java application to interact with the database. It is an open source, lightweight, ORM (Object Relational Mapping) tool. Hibernate implements the specifications of JPA (Java Persistence API) for data persistence.ORM Tool
An ORM tool simplifies the data creation, data manipulation and data access. It is a programming technique that maps the object to the data stored in the database.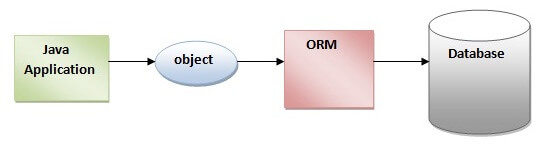
The ORM tool internally uses the JDBC API to interact with the database.
What is JPA?
Java Persistence API (JPA) is a Java specification that provides certain functionality and standard to ORM tools. The javax.persistence package contains the JPA classes and interfaces.Advantages of Hibernate Framework
Following are the advantages of hibernate framework:1) Open Source and Lightweight
Hibernate framework is open source under the LGPL license and lightweight.2) Fast Performance
The performance of hibernate framework is fast because cache is internally used in hibernate framework. There are two types of cache in hibernate framework first level cache and second level cache. First level cache is enabled by default.3) Database Independent Query
HQL (Hibernate Query Language) is the object-oriented version of SQL. It generates the database independent queries. So you don't need to write database specific queries. Before Hibernate, if database is changed for the project, we need to change the SQL query as well that leads to the maintenance problem.4) Automatic Table Creation
Hibernate framework provides the facility to create the tables of the database automatically. So there is no need to create tables in the database manually.5) Simplifies Complex Join
Fetching data from multiple tables is easy in hibernate framework.6) Provides Query Statistics and Database Status
Hibernate supports Query cache and provide statistics about query and database status.
Hibernate Architecture
The Hibernate architecture is categorized in four layers.
- Java application layer
- Hibernate framework layer
- Backhand api layer
- Database layer
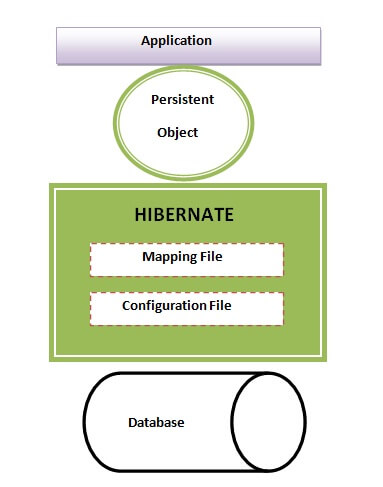 This is the high level architecture of Hibernate with mapping file and configuration file.
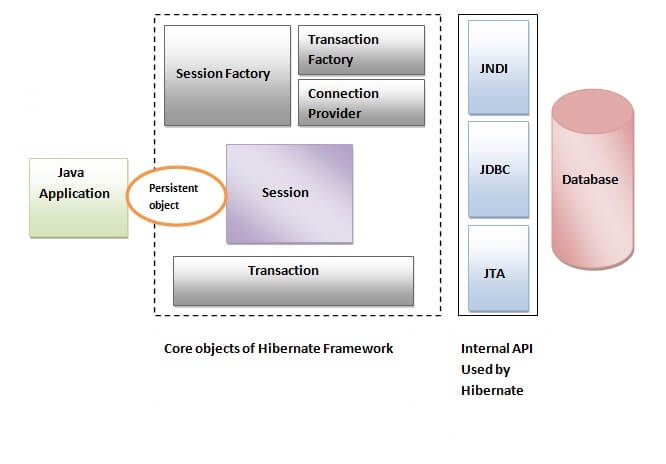 Hibernate framework uses many objects such as session factory,
session, transaction etc. alongwith
Hibernate framework uses many objects such as session factory,
session, transaction etc. alongwithexisting Java API such as JDBC (Java Database Connectivity), JTA (Java Transaction API) and JNDI (Java Naming Directory Interface).
Elements of Hibernate Architecture
| For creating the first hibernate application, we must know the elements of Hibernate architecture. They are as follows: |
SessionFactory
The SessionFactory is a factory of session and client of ConnectionProvider. It holds second level cache (optional) of data. The org.hibernate.SessionFactory interface provides factory method to get the object of Session.Session
The session object provides an interface between the application and data stored in the database. It is a short-lived object and wraps the JDBC connection. It is factory of Transaction, Query and Criteria. It holds a first-level cache (mandatory) of data. The org.hibernate.Session interface provides methods to insert, update and delete the object. It also provides factory methods for Transaction, Query and Criteria.Transaction
The transaction object specifies the atomic unit of work. It is optional. The org.hibernate.Transaction interface provides methods for transaction management.ConnectionProvider
It is a factory of JDBC connections. It abstracts the application from DriverManager or DataSource. It is optional.TransactionFactory
It is a factory of Transaction. It is optional.First Hibernate Example without IDE
- Create the Persistent class
- Create the mapping file for Persistent class
- Create the Configuration file
- Create the class that retrieves or stores the persistent object
- Load the jar file
- Run the first hibernate application by using command prompt
1) Create the Persistent class
A simple Persistent class should follow some rules:
Download the required jar files for hibernate
To run the hibernate application without IDE:
- A no-arg constructor: It is recommended that you have a default constructor at least package visibility so that hibernate can create the instance of the Persistent class by newInstance() method.
- Provide an identifier property: It is better to assign an attribute as id. This attribute behaves as a primary key in database.
- Declare getter and setter methods: The Hibernate recognizes the method by getter and setter method names by default.
- Prefer non-final class: Hibernate uses the concept of proxies, that depends on the persistent class. The application programmer will not be able to use proxies for lazy association fetching.
Employee.java
- package com.javatpoint.mypackage;
- public class Employee {
- private int id;
- private String firstName,lastName;
- public int getId() {
- return id;
- }
- public void setId(int id) {
- this.id = id;
- }
- public String getFirstName() {
- return firstName;
- }
- public void setFirstName(String firstName) {
- this.firstName = firstName;
- }
- public String getLastName() {
- return lastName;
- }
- public void setLastName(String lastName) {
- this.lastName = lastName;
- }
- }
2) Create the mapping file for Persistent class
The mapping file name conventionally, should be class_name.hbm.xml. There are many elements of the mapping file.- hibernate-mapping : It is the root element in the mapping file that contains all the mapping elements.
- class : It is the sub-element of the hibernate-mapping element. It specifies the Persistent class.
- id : It is the subelement of class. It specifies the primary key attribute in the class.
- generator : It is the sub-element of id. It is used to generate the primary key. There are many generator classes such as assigned, increment, hilo, sequence, native etc. We will learn all the generator classes later.
- property : It is the sub-element of class that specifies the property name of the Persistent class.
employee.hbm.xml
- <?xml version='1.0' encoding='UTF-8'?>
- <!DOCTYPE hibernate-mapping PUBLIC
- "-//Hibernate/Hibernate Mapping DTD 5.3//EN"
- "http://hibernate.sourceforge.net/hibernate-mapping-5.3.dtd">
- <hibernate-mapping>
- <class name="com.javatpoint.mypackage.Employee" table="emp1000">
- <id name="id">
- <generator class="assigned"></generator>
- </id>
- <property name="firstName"></property>
- <property name="lastName"></property>
- </class>
- </hibernate-mapping>
3) Create the Configuration file
The configuration file contains information about the database and mapping file. Conventionally, its name should be hibernate.cfg.xml .hibernate.cfg.xml
- <?xml version='1.0' encoding='UTF-8'?>
- <!DOCTYPE hibernate-configuration PUBLIC
- "-//Hibernate/Hibernate Configuration DTD 5.3//EN"
- "http://hibernate.sourceforge.net/hibernate-configuration-5.3.dtd">
- <hibernate-configuration>
- <session-factory>
- <property name="hbm2ddl.auto">update</property>
- <property name="dialect">org.hibernate.dialect.Oracle9Dialect</property>
- <property name="connection.url">jdbc:oracle:thin:@localhost:1521:xe</property>
- <property name="connection.username">system</property>
- <property name="connection.password">jtp</property>
- <property name="connection.driver_class">oracle.jdbc.driver.OracleDriver</property>
- <mapping resource="employee.hbm.xml"/>
- </session-factory>
- </hibernate-configuration>
4) Create the class that retrieves or stores the object
In this class, we are simply storing the employee object to the database.
- package com.javatpoint.mypackage;
- import org.hibernate.Session;
- import org.hibernate.SessionFactory;
- import org.hibernate.Transaction;
- import org.hibernate.boot.Metadata;
- import org.hibernate.boot.MetadataSources;
- import org.hibernate.boot.registry.StandardServiceRegistry;
- import org.hibernate.boot.registry.StandardServiceRegistryBuilder;
- public class StoreData {
- public static void main(String[] args) {
- //Create typesafe ServiceRegistry object
- StandardServiceRegistry ssr = new StandardServiceRegistryBuilder().configure("hibernate.cfg.xml").build();
- Metadata meta = new MetadataSources(ssr).getMetadataBuilder().build();
- SessionFactory factory = meta.getSessionFactoryBuilder().build();
- Session session = factory.openSession();
- Transaction t = session.beginTransaction();
- Employee e1=new Employee();
- e1.setId(101);
- e1.setFirstName("Gaurav");
- e1.setLastName("Chawla");
- session.save(e1);
- t.commit();
- System.out.println("successfully saved");
- factory.close();
- session.close();
- }
- }
5) Load the jar file
For successfully running the hibernate application, you should have the hibernate5.jar file.Download the required jar files for hibernate
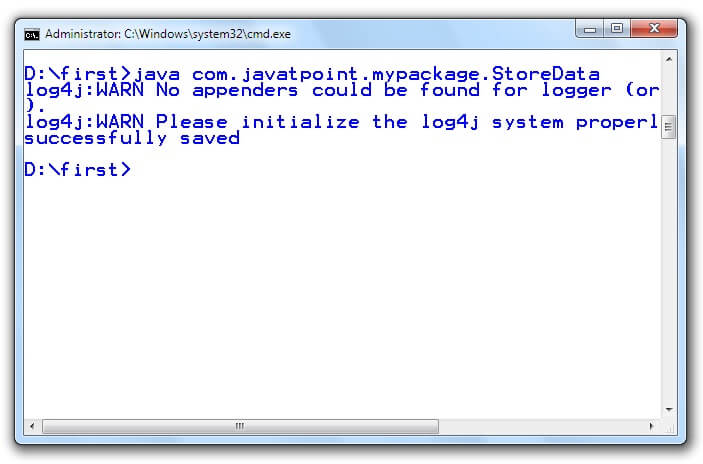
6) How to run the first hibernate application without IDE
We may run this hibernate application by IDE (e.g. Eclipse, Myeclipse, Netbeans etc.) or without IDE. We will learn about creating hibernate application in Eclipse IDE in next chapter.To run the hibernate application without IDE:
- Install the oracle10g for this example.
- Load the jar files for hibernate. (One of the way to load the jar file is copy all the jar files under the JRE/lib/ext folder). It is better to put these jar files inside the public and private JRE both.
- Now, run the StoreData class by java com.javatpoint.mypackage.StoreData
No comments:
Post a Comment