Spring Tutorial

This spring tutorial provides in-depth concepts of Spring Framework with simplified examples. It was developed by Rod Johnson in 2003. Spring framework makes the easy development of JavaEE application.
It is helpful for beginners and experienced persons.
Spring Framework
Spring is a lightweight framework. It can be thought of as a framework of frameworks because it provides support to various frameworks such as Struts, Hibernate, Tapestry, EJB, JSF etc. The framework, in broader sense, can be defined as a structure where we find solution of the various technical problems.The Spring framework comprises several modules such as IOC, AOP, DAO, Context, ORM, WEB MVC etc. We will learn these modules in next page. Let's understand the IOC and Dependency Injection first.
Inversion Of Control (IOC) and Dependency Injection
- class Employee{
- Address address;
- Employee(){
- address=new Address();
- }
- }
- class Employee{
- Address address;
- Employee(Address address){
- this.address=address;
- }
- }
In Spring framework, IOC container is responsible to inject the dependency. We provide metadata to the IOC container either by XML file or annotation.
Advantage of Dependency Injection
- makes the code loosely coupled so easy to maintain
- makes the code easy to test
Advantages of Spring Framework
There are many advantages of Spring Framework. They are as follows:1) Predefined Templates
Spring framework provides templates for JDBC, Hibernate, JPA etc. technologies. So there is no need to write too much code. It hides the basic steps of these technologies.Let's take the example of JdbcTemplate, you don't need to write the code for exception handling, creating connection, creating statement, committing transaction, closing connection etc. You need to write the code of executing query only. Thus, it save a lot of JDBC code.
2) Loose Coupling
The Spring applications are loosely coupled because of dependency injection.3) Easy to test
The Dependency Injection makes easier to test the application. The EJB or Struts application require server to run the application but Spring framework doesn't require server.4) Lightweight
Spring framework is lightweight because of its POJO implementation. The Spring Framework doesn't force the programmer to inherit any class or implement any interface. That is why it is said non-invasive.5) Fast Development
The Dependency Injection feature of Spring Framework and it support to various frameworks makes the easy development of JavaEE application.6) Powerful abstraction
It provides powerful abstraction to JavaEE specifications such as JMS, JDBC, JPA and JTA.7) Declarative support
It provides declarative support for caching, validation, transactions and formatting.
Spring Modules
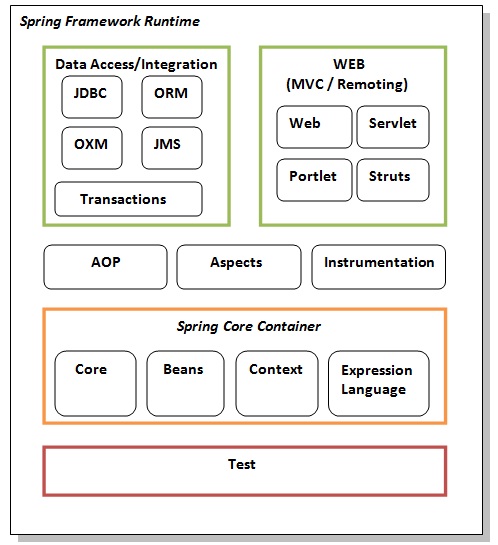
Test
Spring Core Container
The Spring Core container contains core, beans, context and expression language (EL) modules.Core and Beans
These modules provide IOC and Dependency Injection features.Context
This module supports internationalization (I18N), EJB, JMS, Basic Remoting.Expression Language
It is an extension to the EL defined in JSP. It provides support to setting and getting property values, method invocation, accessing collections and indexers, named variables, logical and arithmetic operators, retrieval of objects by name etc.AOP, Aspects and Instrumentation
These modules support aspect oriented programming implementation where you can use Advices, Pointcuts etc. to decouple the code.The aspects module provides support to integration with AspectJ.
The instrumentation module provides support to class instrumentation and classloader implementations.
Data Access / Integration
This group comprises of JDBC, ORM, OXM, JMS and Transaction modules. These modules basically provide support to interact with the database.Web
This group comprises of Web, Web-Servlet, Web-Struts and Web-Portlet. These modules provide support to create web application.
Example of spring application in Myeclipse
Creating spring application in myeclipse IDE is simple. You don't need to be worried about the jar files required for spring application because myeclipse IDE takes care of it. Let's see the simple steps to create the spring application in myeclipse IDE.- create the java project
- add spring capabilities
- create the class
- create the xml file to provide the values
- create the test class
Steps to create spring application in Myeclipse IDE
Let's see the 5 steps to create the first spring application using myeclipse IDE.1) Create the Java Project
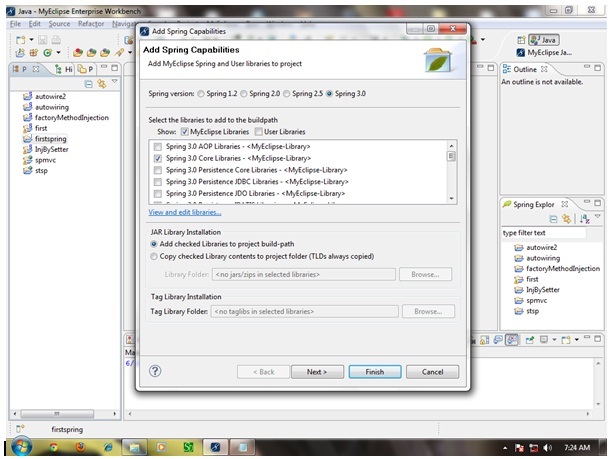
Go to File menu - New - project - Java Project. Write the project name e.g. firstspring - Finish. Now the java project is created.2) Add spring capabilities
Go to Myeclipse menu - Project Capabilities - Add spring capabilities - Finish.
Now the spring jar files will be added. For the simple application we need only core library i.e. selected by default.
This is simple bean class, containing only one property name with its
getters and setters method. This class contains one extra method named
displayInfo() that prints the student name by the hello message.
The bean element is used to define the bean for the given class. The property
subelement of bean specifies the property of the Student class named
name. The value specified in the property element will be set in the
Student class object by the IOC container.
The Resource object represents the information of applicationContext.xml file. The Resource is the interface and the ClassPathResource is the implementation class of the Reource interface.
The BeanFactory is responsible to return the bean. The XmlBeanFactory is the implementation class of the BeanFactory. There are many methods in the BeanFactory interface. One method is getBean(), which returns the object of the associated class.
Now run the Test class. You will get the output Hello: Vimal Jaiswal.
3) Create Java class
In such case, we are simply creating the Student class have name property. The name of the student will be provided by the xml file. It is just a simple example not the actual use of spring. We will see the actual use in Dependency Injection chapter. To create the java class, Right click on src - New - class - Write the class name e.g. Student - finish. Write the following code:- package com.javatpoint;
- public class Student {
- private String name;
- public String getName() {
- return name;
- }
- public void setName(String name) {
- this.name = name;
- }
- public void displayInfo(){
- System.out.println("Hello: "+name);
- }
- }
4) Create the xml file
In case of myeclipse IDE, you don't need to create the xml file as myeclipse does this for yourselves. Open the applicationContext.xml file, and write the following code:- <?xml version="1.0" encoding="UTF-8"?>
- <beans
- xmlns="http://www.springframework.org/schema/beans"
- xmlns:xsi="http://www.w3.org/2001/XMLSchema-instance"
- xmlns:p="http://www.springframework.org/schema/p"
- xsi:schemaLocation="http://www.springframework.org/schema/beans
- http://www.springframework.org/schema/beans/spring-beans-3.0.xsd">
- <bean id="studentbean" class="com.javatpoint.Student">
- <property name="name" value="Vimal Jaiswal"></property>
- </bean>
- </beans>
5) Create the test class
Create the java class e.g. Test. Here we are getting the object of Student class from the IOC container using the getBean() method of BeanFactory. Let's see the code of test class.- package com.javatpoint;
- import org.springframework.beans.factory.BeanFactory;
- import org.springframework.beans.factory.xml.XmlBeanFactory;
- import org.springframework.core.io.ClassPathResource;
- import org.springframework.core.io.Resource;
- public class Test {
- public static void main(String[] args) {
- Resource resource=new ClassPathResource("applicationContext.xml");
- BeanFactory factory=new XmlBeanFactory(resource);
- Student student=(Student)factory.getBean("studentbean");
- student.displayInfo();
- }
- }
Now run the Test class. You will get the output Hello: Vimal Jaiswal.
No comments:
Post a Comment